Introduction
Herman Miller has built a strong reputation over the years as a go-to brand for high-quality, ergonomic office furniture. Known for combining comfort, durability, and sleek design, they’ve become a trusted name in workplaces around the world. Whether it’s their iconic Aeron chair or other smartly engineered pieces, Herman Miller is often the first choice for people who spend long hours at a desk and want furniture that supports good posture and lasts for years.
Herman Miller chairs aren’t cheap. And if your chair starts acting up, the idea of shelling out for a brand-new one probably doesn’t sound too appealing. That’s why a lot of people choose to fix their chairs instead of replacing of.
For starters, it’s just more practical. Swapping out a part or doing a quick repair can get your chair back in shape without the big price tag.
There’s also the sustainability side of things. Why throw away a good chair when you can fix it and keep it going strong? It’s a better choice for both your budget and the planet.
And then there’s comfort. If you’ve been sitting in the same chair for years, you know how it fits you. Getting used to a brand new chair can take time and it might not feel quite right. Sometimes, it’s better to stick with what you know and just give it a little TLC.
This isn’t just another generic how-to. You’ll walk away with real, practical info like easy DIY repair steps you can actually follow, tips on when it’s better to get a pro involved, and a rough idea of how much money you could save by fixing your Herman Miller chair instead of buying a new one. It’s all about helping you make a smart call without wasting time or cash.
Why Herman Miller Chairs Break
1. Gas Cylinder Wobble or Sinking
Over time, the gas cylinder is one of the most common parts to wear out, leading to instability or the chair slowly sinking. As one user noted:
“Aeron gas cylinder wobble is a common problem that leads to bad ergonomics of the chair.” Reddit
2. Tilt Mechanism Malfunction
Some users have reported issues with the tilt mechanism, such as the chair not reclining properly. For instance:
“The rear tilt gear is stuck. To solve this issue, you need to replace the white rear tilt stopper plastic part.” Reddit
3. Seat Mesh Sagging or Tearing
The mesh seat can sag or tear over time, affecting comfort and support. One user shared:
“I’ve had my backrest fabric tear after 2 years of light use.” Reddit
4. Arm Pad Wear
Arm pads may crack or become uncomfortable with prolonged use. Replacing them with Classic Aeron Arm Pads can restore comfort.
5. Lumbar Support Issues
The lumbar support may become detached or less effective over time. Ensuring it’s properly adjusted or replaced can improve back support.
How you use your chair really matters. If you’re a gamer who spends hours locked in, constantly leaning back, shifting around, or adjusting the tilt, parts like the seat base, tilt mechanism, or gas lift might wear out faster. But if you’re a typical remote worker, mostly sitting upright and staying in one position for long stretches, it’s usually the wheels, armrests, or lower back support that start to wear down. Everyone uses their chair a bit differently, so different parts take the most stress. Knowing how you use yours can help you spot what’s wearing out early before it turns into a bigger issue.
Tools You’ll Need for FIXING HERMAN MILLER CHAIR
Basic Tools You Might Need:
- Hex keys (Allen wrenches)
- Phillips or flathead screwdriver
- Replacement parts (like casters, arm pads, or gas lift)
- Lubricant (WD-40 works great for squeaks)
- A clean cloth or rag for wiping down parts
These are usually all you need to handle most minor chair fixes at home.
If your chair isn’t working like it used to, maybe it won’t go up or down, the tilt feels off, or something just seems worn out, you might not need to replace the whole thing. In many cases, you can fix it yourself with a basic repair kit.
For example, if the chair won’t adjust in height, that usually means the gas lift or cylinder needs to be replaced. You can find cylinder replacement kits on Amazon, and they’re made with DIY in mind. These kits come with the parts you need and clear instructions to help you through the repair. No special tools or experience are required, just a little bit of time and patience.
They’re perfect if it’s your first time trying a fix like this or if you just want a simple way to get your chair working again without guessing what parts to buy.
Not sure how to do the repair? You can find tons of helpful videos on YouTube or step-by-step guides on iFixit. Just search for something like “how to replace gas lift on an Aeron chair,” and you’ll find easy-to-follow tutorials that show you exactly what to do.
Tilt Mechanism Repair
Is your chair no longer leaning back like it used to? Or maybe the tilt lock stopped working, and now you’re stuck sitting straight up no matter what you do? You’re not alone, this happens to a lot of people, especially with chairs that get used every day. The good news is, you don’t need to throw out your chair or spend a ton of money on a new one. Most of the time, it’s something small that can be fixed at home.
This guide will help you figure out what’s going on with the tilt. Whether it’s stuck, moving too freely, or not locking when you lean back, we’ll walk you through how to check the tilt mechanism, clean it if needed, and swap out any part that’s worn or broken. You don’t need to be super handy or have fancy tools, just a little time and patience.
Watch the full step-by-step video tutorial below. It shows you exactly what to do, so you can follow along and get your chair reclining smoothly again in no time.
Lumbar Support Installation
If your lower back starts to feel sore after sitting for a while, your chair might not be giving you the support you need. Over time, the lumbar support can wear out, shift out of place, or just stop feeling as comfortable as it used to. Or maybe your chair didn’t come with proper lower back support in the first place. Either way, adding or replacing the lumbar support can make a big difference in how your back feels, especially if you sit for hours every day.
We’ve found a helpful video that shows exactly how to install or replace the lumbar support on your chair. You don’t need to hire anyone or buy any fancy tools. It’s a simple fix that only takes a few minutes, and once it’s done, you’ll notice the extra comfort right away.
Step-by-Step Fixes
A. Replacing the Gas Cylinder
Signs Your Gas Cylinder Might Be Failing
One of the most common issues with office chairs is a worn-out gas cylinder and there are some obvious ways to tell if yours is on the way out:
- The chair slowly lowers itself – You adjust the height, but after a while, it starts sinking again.
- It won’t stay at the height you set – You lift it up, but it just won’t hold.
- The height lever feels loose or unresponsive – You try to raise or lower the seat, but it either doesn’t move or won’t stay where you want it.
- Sudden drops when you sit down – The seat drops unexpectedly, which can be frustrating and even a little jarring.
If you’re dealing with any of these problems, it’s likely the gas cylinder has worn out. The good news? Replacing it is pretty straightforward and doesn’t take much time.
How to Remove and Install a Gas Cylinder on Your Office Chair
Before You Begin:
Place your chair on a flat surface. If you’re working indoors, put down a towel or piece of cardboard to protect the floor.
Step 1: Turn the Chair on Its Side
This makes it easier to reach the parts underneath, especially the cylinder and base.
Step 2: Take Off the Wheel Base
Grab the wheel base firmly and carefully pull it off from the metal cylinder connected to the seat. If it doesn’t come off right away, try twisting it back and forth or giving it a few firm taps with your hand until it loosens.
Step 3: Remove the Old Gas Cylinder
Grab the metal cylinder and twist or wiggle it free from the chair seat. If it’s stuck, you can tap around the base with your hand or use a rubber mallet if needed, just be careful not to damage anything.
Installing the New Gas Cylinder
Step 4: Attach the New Cylinder to the Base
Slide the narrow part of the new cylinder into the center hole of the wheel base and press it in firmly until it sits in place. It should fit snugly and sit straight.
Step 5: Reconnect the Seat
Set the chair seat over the new cylinder, making sure the top of the cylinder fits right into the opening under the seat. Press down firmly to make sure it’s all in place.
Step 6: Stand the Chair Up and Lock It In
Turn the chair upright again and sit on it. Your body weight will help push everything into place and secure the connection between the parts.
Step 7: Test the Height Adjustment
Use the lever to check if the chair goes up and down smoothly. If everything feels good, the repair is complete.
That’s it! No special tools or advanced skills needed, just a bit of patience and a few minutes of your time.
Safety Precautions
Before you start, it’s important to keep a few safety tips in mind:
- Work on a flat, stable surface – This keeps the chair from tipping or sliding while you’re working on it.
- Lay down a towel or mat – It protects your floor and gives you a soft area to work on.
- Use two hands when removing or lifting parts – Chair parts like the base or cylinder can be a bit heavy or awkward to handle.
- Be careful when the cylinder is under pressure – If your old gas cylinder is stuck, avoid hitting it too hard or using sharp tools. It’s under pressure and could be dangerous if damaged.
- Wear gloves if you have them – They help protect your hands from grease, dirt, or pinched fingers.
Take your time, go slow, and never force parts into place. A little patience goes a long way when working safely.
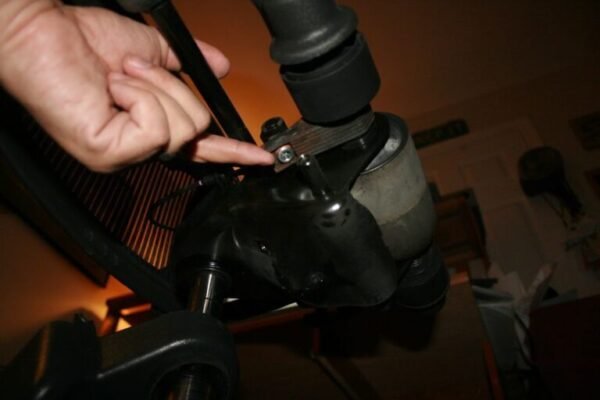
B. Fixing Tilt Mechanism Issues
Common Problems to Look Out For:
- Chair leans to one side
This could mean the tilt tension is uneven or something inside the mechanism is loose or worn out. - Tilt lock won’t engage
You pull the lever, but the chair won’t lock into a reclined or upright position. - Chair is stuck in one position
It won’t recline or return upright, no matter how much you try to adjust it. - Loose or wobbly feel when leaning back
The tilt tension may be too low, or internal parts could be wearing out. - Tilt feels stiff or unresponsive
The mechanism may need lubrication, cleaning, or adjustment.
If you’re noticing any of these, it’s likely time to check the tilt mechanism. Most of these issues can be fixed with some basic adjustments or part replacements.
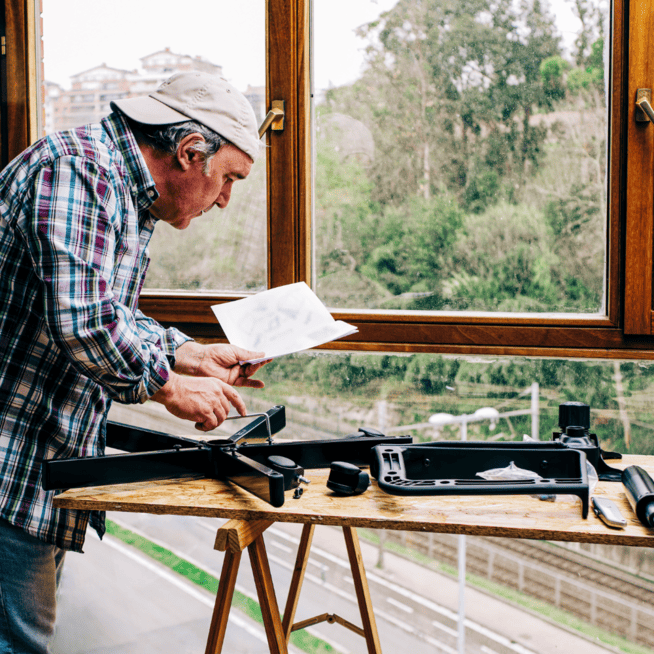
Disassembly Tips for Classic Aeron Chair Tilt Mechanism
- Lay the chair on its back or side on a soft surface to avoid scratches.
- Use the right tools like hex keys and a Phillips screwdriver, no power tools.
- Take photos before starting so you remember how everything fits.
- Loosen the screws one at a time to keep everything balanced and prevent damage.
- Keep all small parts together in a cup or container.
- Check for hidden screws or covers before pulling anything apart.
- Don’t force parts loose, something might still be attached.
- Be careful with internal springs, as they may still hold tension.
Go slow, stay organized, and it’ll be much easier to reassemble later.
Need to take your chair apart before a repair? Follow our step-by-step guide on how to disassemble aeron chair.
C. Fixing or Replacing Your Chair’s Armrests
Common Armrest Issues
Armrests can start to wear out, especially if you use your chair every day. Some typical problems include:
- Squeaking or creaking when you rest your arms or shift in your seat
- Armrests that feel loose or wobble when you use them
- Padding that’s cracked, flattened, or no longer comfortable
These are often minor problems, and in many cases, you can take care of them yourself with a quick repair or swap.
How to Tighten or Replace Your Armrests
- Look underneath the armrest
Check for any screws that hold the armrest in place. If they’re loose, use a screwdriver or hex key to tighten them. - Remove the old armrest
If the armrest is damaged or too worn out, unscrew it and lift it off the chair. If you’re working on a classic Aeron, it helps to know how to remove arms from Aeron chair properly so you don’t strip screws or force parts that are still locked in place. - Attach the new armrest
Match the screw holes on the new armrest with the ones on the chair frame. Once they’re lined up, tighten the screws, but don’t overdo it. - Test for comfort and stability
Once everything’s in place, press down and move the armrest to make sure it’s secure. If it still feels loose, go back and check the screws again.
Even a small fix like this can make your chair feel much more supportive and comfortable, especially if the armrests were starting to bug you.
D. Mesh and Seat Pan Problems
How to Tell If the Mesh Is Worn Out
The mesh on your Aeron chair takes a lot of use over time, so it’s normal for it to stretch, sag, or even tear. Here are a few signs it might be time for a fix:
- The seat or back feels saggy or loose
- You notice small holes or rips starting to show
- The mesh doesn’t bounce back when you sit or move around
If your chair doesn’t feel as supportive or comfy as it used to, the mesh is probably wearing down.
Is It Better to Patch or Replace?
A small tear might seem like an easy fix, and while patching it is okay for the short term, it usually doesn’t last, especially if you sit in the chair every day. The patch might peel off or keep the mesh from moving the way it should.
When the mesh starts to sag or tear, swapping it out completely is usually the smartest option if you want it to last. A new mesh will make your chair feel firmer, fresher, and way more comfortable again. It’s a bit of a project, but worth it if you want to keep using your chair for years to come.
How Much Will It Cost?
Here’s a general idea of what you might spend
Just the mesh (seat or back) – usually around $100 to $200
Full seat pan with mesh included – about $200 to $300
Prices vary depending on where you buy it. If you’re comfortable doing the repair on your own, you can cut costs by skipping the repair shop. Either way, replacing the mesh is a solid investment, it’ll bring your chair back to life and make working or sitting for long hours a lot more comfortable.
Ensure peace of mind by verifying your chair’s authenticity. Explore the Herman Miller Authenticity Checklist 2025.
Repair vs. Replace: How to Tell What Your Chair Really Needs
Not every chair issue means you need to buy a whole new part or a new chair altogether. In many cases, a simple fix can solve the problem. Here’s a simple breakdown to help you figure out what’s worth repairing and what needs replacing:
Loose or squeaky parts?
Try tightening the screws or adding a little lubricant like WD-40. That usually solves minor problems without much effort.
Tilt mechanism feeling off?
If the tilt is just stiff or uneven, a good cleaning and some small adjustments might bring it back to life. But if it’s cracked, jammed, or completely unresponsive, replacing the mechanism is likely the safest bet.
Flat arm pads or worn-out lumbar support?
These parts are all about comfort. Once they’re torn or no longer feel supportive, it’s worth replacing them to keep your chair feeling good.
Chair won’t stay up?
If your seat keeps sinking no matter how many times you adjust it, the gas cylinder is probably shot. It can’t be fixed, but luckily, it’s one of the easiest parts to replace.
Cracked frame or broken seat base?
These are big issues. If the frame or base is damaged, it’s best to replace the part. Using a chair with a broken structure isn’t just uncomfortable it can also be unsafe.
If it’s a small issue like a squeak, a wobbly armrest, or worn padding, a repair usually does the trick. But if something’s broken, not working at all, or affecting how you sit and move, it’s time for a replacement.
When to Call a Professional
If you need professional repair for your Herman Miller Aeron chair, Nulife Chairs is here to help. We specialize in refurbishing and fixing classic Aeron chairs with quality parts and expert service.
Visit nulifechairs.com or email support@nulifechairs.com to get started.
Before you spend money on parts or repairs, it’s a good idea to check if your chair is still under warranty. Herman Miller chairs often come with long warranties, sometimes up to 12 years, so you might be covered without even knowing it.
Look for your chair’s serial number (usually under the seat) and contact the company or the place you bought it from. If it’s still under warranty, they might replace the part or fix the issue at no cost to you.
It only takes a few minutes to check, and it could save you a lot of time and money.
Cost Comparison: DIY vs. Buying Refurbished
DIY Costs for Classic Aeron Chair Repairs
Doing the repair yourself can save money, but it’s still good to know what you’re looking at in terms of cost. Here’s a rough breakdown of what you might spend on common parts and tools:
Common Replacement Parts:
Gas cylinder – $150 to $200
Arm pads (pair) – $50 to $100
Lumbar support – $40 to $90
Back mesh – $200 to $300
Seat pan with mesh – $200 to $300
Tilt mechanism – $80 to $150
Caster wheels (set of 5) – $40 to $90
Basic Tools (if you don’t already have them):
Hex key/Allen wrench set – $10 to $20
Screwdriver set – $10 to $25
Rubber mallet (for cylinder removal) – $10 to $15
WD-40 or similar lubricant – $5 to $10
Tip: Some parts come in kits with the needed tools included, which can save you even more.
In most cases, doing the repair yourself will cost far less than replacing the chair or paying for professional service. Just make sure you’ve got the right part and a little time set aside.
Time vs. Money: Is DIY Worth It?
Fixing your Classic Aeron Chair yourself can definitely save you money, but it does come with a time cost. If you’re handy and have the tools, a simple repair like replacing the gas cylinder or arm pads might only take 15 to 30 minutes. More involved fixes, like changing the tilt mechanism or seat mesh, could take an hour or two, especially if it’s your first time.
On the flip side, paying a pro or going through a repair service means less hassle for you, but the labor cost adds up fast. In some cases, hiring someone to fix your chair can cost as much as the part itself, or even more.
So it really comes down to what’s more valuable to you:
Your time, if you’d rather not deal with the tools and steps
Or your money,if you’re willing to invest a bit of time to save a decent amount
For many people, DIY is worth it. You get the satisfaction of fixing it yourself, and your wallet stays happy too.
Refurbished Alternative
Let’s be real, brand-new Herman Miller Aeron chairs are amazing… but they’re also crazy expensive. And fixing up a used one yourself? That takes time, tools, and a lot of guesswork.
That’s where we come in.
At Nulife Chairs, we take real Aeron chairs and professionally refurbish them so they feel just like new, without the scary price tag. We replace anything that’s worn out, test everything, and even give you a lifetime warranty on all mechanical parts. No stress, no surprises.
You get the comfort, quality, and cool factor of a $1,200+ chair for way less, and we ship it straight to your door, free. Want more support? Add a headrest to make it even more comfortable.
Whether you’re setting up your home office, gaming setup, or upgrading the whole team at work, our chairs just make sense.
Save money. Skip the hassle. Sit better.
Maintenance Tips to Avoid Future Repairs
Easy Ways to Take Care of Your Classic Aeron Chair
Taking just a little time to care for your chair every now and then can keep it feeling great and lasting a lot longer. Try these quick tips to help your chair last longer:
- Give it a quick wipe-down – Use a damp cloth to clean the frame, arms, and mesh. It helps get rid of dust, sweat, and everyday dirt.
- Vacuum the seat and back – Mesh can collect crumbs, lint, and who-knows-what over time. A quick pass with the vacuum does the trick.
- Check for loose screws – Every few months, take a minute to check under the seat or around the armrests. If anything’s wiggly, tighten it up.
- Spray a little lubricant if needed – If something’s squeaking or not moving as smoothly, a small bit of WD-40 can help.
- Clean the wheels – Hair and gunk love to get stuck in there. Flip the chair over and pull it out when you get the chance.
- Make sure everything still works right – Every once in a while, test the height and tilt. Catching small issues early can save you a bigger fix later.
None of this takes long, but it makes a big difference. Treat your chair right, and it’ll keep you comfy for years.
Learn office chair maintenance tips to keep your chair comfortable and durable for years. Check it out and start protecting your chair today.
Use Your Chair the Right Way
- Remote workers – Sit all the way back with your feet flat on the floor. Adjust the height so your elbows rest comfortably at desk level.
- Gamers – Take breaks often and avoid slouching. Keep your monitor at eye level to reduce neck strain.
- Tall or short users – Adjust the chair height and armrests so your body feels supported without reaching or sinking.
A few small posture tweaks can make a big difference in comfort and long-term support.
Annual Checkup for Your Chair
Once a year, give your chair a full once-over:
- Check the tilt and height functions – Make sure everything moves smoothly.
- Inspect screws and bolts – Tighten anything that feels loose.
- Look for wear and tear – Check the mesh, armrests, and wheels for damage or sagging.
- Touch up scuffs – If you notice scuffs or scratches, a bit of touch up paint can keep it looking fresh.
- Test overall comfort – If something feels off, it might be time for a small fix or part replacement.
A yearly check keeps your chair in top shape and helps you catch small issues before they turn into bigger ones.
Still Got Life Left in That Chair
If your Herman Miller chair’s been acting up, don’t panic—you probably don’t need to toss it. Most of the time, it’s something small like a tired gas lift or squeaky armrest that’s easy (and cheap) to fix.
You can tackle a lot of repairs yourself, even if you’re not super handy
For the big stuff, pros like us at Nulife Chairs can step in
A little regular cleaning and tightening goes a long way
And hey, if you’re over the hassle, we’ve got fully refurbished Aerons ready to go, delivered right to your door
With the right fix, your chair can feel like new again. Save your money. Skip the landfill. Sit happy.
Why Fixing Your Chair Is Totally Worth It
Trying a repair isn’t just about saving a few bucks (though that’s a big win). It’s about getting more life out of a really well-made chair that was built to last in the first place.
You save money – A new Aeron chair can cost over a grand. Most common fixes cost a fraction of that.
You keep a good chair going – Why toss out something great when it just needs a new part or a quick tweak?
You might pick up a new skill – Whether it’s changing a gas cylinder or fixing the tilt, you’ll learn something handy for the future.
It feels good to bring something back to life all on your own. It’s good for your wallet, the planet, and maybe even your confidence.
Not Into DIY? Go Refurbished Instead
If fixing your chair feels like too much work or if it’s just beyond repair, going refurbished is the smartest move you can make.
At Nulife Chairs, we take real Herman Miller Aeron chairs and fully restore them with care. We replace worn-out parts, test everything, and back each one with a lifetime warranty on all mechanical components.
High-end design, lower cost – Get the premium look and feel without the premium price tag.
Worry-free – Every chair is professionally refurbished, tested, and guaranteed to last
Better for the planet – Skip the landfill and choose a more sustainable option
It’s the perfect middle ground, no need to overspend on new or stress over doing the repairs yourself. Just sit back, relax, and enjoy a chair that’s as good as new.
Frequently Ask Questions:
Start by adjusting the tilt tension knob and applying lubricant if it feels stiff. If that doesn’t help, the mechanism may need to be cleaned or replaced. For major issues, a repair kit or professional help might be needed.
Yes, definitely. Most issues, like a worn gas cylinder or tilt problem, can be fixed for much less than buying a new chair. You’ll save money, extend the life of a high-quality chair, and reduce waste.
You can find high-quality parts for Herman Miller Aeron chair directly at Nulife Chairs. We offer compatible replacement parts for Classic Aeron models, including gas cylinders, arm pads, tilt mechanisms, and more. Every part is tested for quality and fit, so you can repair your chair with confidence.
If your chair sinks when you sit or won’t stay at the height you set, the gas cylinder is likely worn out. This part controls the chair’s height adjustment, and over time, it can lose pressure. Replacing the gas cylinder usually fixes the issue.
Yes, you can, if you’re comfortable with DIY repairs. Small tears might be temporarily patched, but for sagging or damaged mesh, full replacement is the better long-term fix. You’ll need basic tools and a replacement mesh or seat pan that matches your chair’s size.
Don’t let a squeaky chair ruin your day.
Upgrade to comfort with our high-quality refurbished Herman Miller Aeron chairs.


